Thursday, June 17, 2010

Quinoa: The Underappreciated Superfood

Once upon a time, back when I was a rower on the CU crew team, every member of the team was required to pitch in $40 so we could hire a nutritionist/"life coach". Our team captain insisted that he was awesome; he would teach us how to eat healthy on a college student-friendly budget in order to improve our athletic performance. It seemed like a good idea at the time, but the guy turned out to be almost completely useless. He served up a bunch of super expensive "health food" that I'm sure was never intended for human consumption and blathered on and on about his various unsubstantiated food conspiracy theories. He claimed that American corporations are on a mission to make us fat and slowly poison us with non-organic food. Apparently, all bread sold in grocery stores is made from old wheat that will slowly kill you. Your only hope is to buy wheat and grind it into flour yourself to make your own bread. I think he may have even said something about the government injecting cows with hormones to try to control our minds, but after ten minutes or so I tuned him out and started brainstorming ways to get my $40 back.

However, between the $50-for-a-tiny-bag berries that tasted like dog food and the soggy vegetables that I watched him prepare in a rather unhygienic manner, Crazy Hippie Nutritionist did introduce us to one worthwhile food: quinoa. With its mild, slightly nutty flavor and somewhat crunchy texture, quinoa was quite inoffensive compared everything else Crazy Hippie Nutritionist was trying to make us eat. Yet despite its unpretentious flavor and appearance, quinoa comes packed with nutritional benefits. Not only is it an excellent source of carbohydrates, dietary fiber, phosphorus, and B vitamins, quinoa is also high in protein. The protein found in quinoa contains all eight of the essential amino acids humans require, making quinoa one of the most complete plant proteins in the world.


Quinoa is native to South America. It was first cultivated by the Incas, and it was a central part of their culture. Quinoa is considered a "pseudocereal" because although it has grain-like characteristics, it comes from a plant related to leafy green vegetables like spinach rather than a grass.


Quinoa is still uncommon in most kitchens in the United States, so finding it can be a little tricky. Any health food store should carry quinoa, but shopping in such locales runs the inherent risk of encountering people like Crazy Hippie Nutritionist. But, don't worry, there's still hope for those of us who find Crazy Hippie Nutritionist distasteful (if not downright frightening)! Many large supermarkets are beginning to carry quinoa, so you can now purchase it while shopping amongst normal people! Look for quinoa either in the "natural foods" section of your favorite grocery store or on the same aisle as rice. Quinoa is a versatile side dish that can be an interesting alternative to other grains like rice and couscous. Here's a basic quinoa recipe to get you started:

Sunflower Seed Quinoa
Yield: 6 servings
Prep/Cook Time: About 20 minutes


Ingredients:

A) 2 cups uncooked quinoa
B) 2 tablespoons oil (I used canola oil)
C) 1/4 cup raw, unsalted sunflower seeds
D) 2 1/4 cups water
E) salt and pepper, to taste


In a medium pan, combine the quinoa, oil, and sunflower seeds and heat over medium heat. This will toast the quinoa and bring out it's nutty flavor. Keep stirring the quinoa while it's heating to ensure that it's toasted evenly. Once the pan heats up, the quinoa will start to sizzle and pop. Keep stirring for a couple minutes once the popping starts, and let the grains brown a little.

Once the quinoa is nice and toasty, pour in the water and bring the quinoa to a boil.


Cover the pot, and reduce the heat. Allow the quinoa to simmer for eleven minutes, and then remove the pot from the heat and let it stand for five minutes (make sure the lid stays on the entire time).


Once the five minutes are up, stir the quinoa to fluff it up and add however much salt and pepper you want. That's all there is to it!

Quinoa is a fast, easy, and nutritious addition to almost any meal, so it's unfortunate that this tasty pseudograin continues to suffer from a lack of popularity. Give this underappreciated superfood a try the next time you're in the mood for something new, and see for yourself that quinoa is suitable for enjoyment by everyone, not just the Crazy Hippie Nutritionists out there.

Saturday, June 12, 2010

The Joy of Fat


Whether you're making a flaky pie crust, a mouthwatering cookie, a fluffy pastry, or a decadent cake, your culinary creation is going to require a healthy dose of fat. Choosing the right fat for the right dessert can make all the difference between a delectable dessert and a disappointing disaster. Today's post will explore the seven most common fats found in baked goods and help you choose the perfect one for any recipe.


The Solid Fats


Butter

Butter is the ultimate staple baking ingredient. It plays a key role in giving baked goods body, texture, and flavor. Butter's main function is to give a batter or dough structure by creating pockets of air. That's why many cookie recipes begin with creaming the butter: Creaming incorporates air into the butter, creating tiny bubbles. Leavening agents such as baking soda or baking powder will later expand these bubbles, giving the finished product a light, fluffy texture. For best results, experts recommend creaming your butter for at least three minutes to ensure that it is adequately aerated.


One quandary faced by cooks when choosing butter is whether to buy the salted or unsalted variety. While salted and unsalted butter can generally be used interchangeably, there are a few differences between the two to keep in mind. Salted butter will obviously add more salt to your recipe, so you may have to reduce the amount of salt the recipe calls for so the flavor of the end product isn't affected. Although salted butter has a longer shelf life, it contains more water than the unsalted version which means it can't hold air pockets quite as well. Therefore, when you're making delicate pastries that depend on achieving the lightest, fluffiest texture, unsalted butter will probably give you the best possible results.


Shortening

Shortening is a relatively new addition to the culinary world. Unlike butter, which has been used for hundreds of years, shortening was created in the 1870's by hydrogenating vegetable oils to create a solid fat. Crisco, the most popular brand of shortening in the United States, began commercially producing shortening in 1911.

Shortening has a much higher melting point than butter which allows it to help cookies and other baked goods develop volume. Many cookie recipes call for using a combination of butter and shortening because while butter provides excellent flavor, cookies made only with butter may turn out a little flat due to butter's low melting point. Because shortening doesn't melt until after the cookies have already risen and set, it helps them hold their shape. Another distinct trait of shortening is that it doesn't contain any water. As a result, gluten in the flour isn't able to expand as much, and this gives baked goods made with shortening their signature tender texture.


Because shortening is made from hydrogenated oils, it has received negative attention in recent years as studies have highlighted the health risks posed by trans fats created during the hydrogenation process. In response, all major shortening companies have changed their formulas to reduce the amount of trans fat in their products. A few specialty brands have managed to create a shortening that contains no trans fat at all, so shortening has actually become a somewhat more healthy way to add fat to recipes.


Lard

Before shortening became a common household ingredient, lard was the main alternative to butter when it came to baking. Lard and shortening serve almost identical purposes in baking. However, lard lost popularity over the years as shortening became cheaper and more readily available. However, some cooks insist that only lard should be used in pie crusts or biscuits to give them a perfect, light, flaky texture. Lard and shortening can be used interchangeably, although there is a slight flavor difference between the two. Shortening is unflavored, but lard will add a subtle meaty or nutty flavor to baked goods.


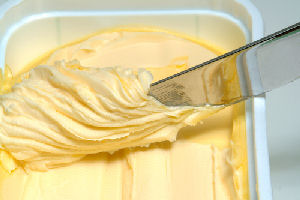
Margarine

Margarine is made by hydrogenating vegetable oils, similar to the process used to create shortening. Unlike shortening, margarine does not have a high melting point, and it still contains a fair amount of trans fat. Margarine is not a good substitute for shortening or butter because it lacks shortening's volume-preserving properties and butter's rich flavor. Unless a recipe specifically calls for margarine, it's generally best to avoid using it in baking.


The Liquid Fats


Liquid fats are used in baking to reduce stickiness, retain delicate flavors, and provide a moist texture. While liquid fats can't hold air like their solid counterparts, liquid fats are frequently used in cakes, muffins, brownies, certain breads, and other baked goods that don't necessarily rely on aeration. Liquid fats come in an enormous variety of forms, but the three most commonly used in baking are canola oil, vegetable oil, and olive oil.

Canola Oil

Canola oil is a very popular all-purpose oil. It has a bland flavor, so it won't interfere with the flavors of other ingredients in baked goods. This is especially important with delicate flavors like vanilla that can easily be overpowered.


Vegetable Oil

"Vegetable oil" typically refers to soybean oil. Like canola oil, soybean oil has a neutral flavor that won't affect the taste of the finished product. Overall, vegetable oil is extremely similar to canola oil, although canola oil does contain more potentially beneficial compounds like omega-3 fatty acids.


Olive Oil

Olive oil is quite a bit less common in everyday baking than canola or vegetable oil due to its much stronger flavor. While some cooks enjoy the olive aroma in cakes and cookies, most prefer to use more neutral oils in baked goods. However, certain breads are excellent candidates for being made with olive oil. Olive oil gives bread a denser texture than other liquid fats and can provide a more complex flavor.


Fat is an essential component to almost all baked goods, and by understanding the subtle differences between commonly used fats, you can alter the texture and flavor of your recipes to suit your tastes. Whether you use butter, shortening, lard, or your choice of liquid fat, with a little background knowledge you can create treats that are simply divine.

Sunday, June 6, 2010

Cheese Making Made Easy: Fromage Blanc

The ancient art of cheese making can seem overwhelmingly complicated at first glance. With some varieties of cheeses requiring specialized equipment and long periods of aging, cheese making often isn't something the average cook considers bothering with. However, not all cheeses are as complicated as many people believe. Fromage blanc ("white cheese" in French) is one such cheese that can be made in an hour or two from just a few simple ingredients. It's a soft, mild, and delicious cheese that you can brag about making yourself!


Part 1: Ingredients and materials

Fromage blanc requires just four simple ingredients:

A) 1 quart of whole milk

B) 1 cup of active-culture buttermilk (anything that says something like "cultured buttermilk" on the label should be fine)

C) 2 teaspoons of white vinegar

D) 1/2 to 3/4 teaspoon of salt to taste


The materials you need aren't too complicated either:

* Heavy saucepan

* Wooden spoon

* Candy thermometer (recommended, but not 100% necessary)

* Colander

* A pot the colander can sit over

* Cheesecloth and a bit of string

* A mold to press the cheese curds into (a small bowl works fine)


The only material most people may not already have lying around their homes is the cheesecloth.

Cheesecloth can be found in fabric stores and most stores that carry arts and crafts supplies. Some grocery stores carry it with their cooking gadgets, and I'm told that cheesecloth can also be found in hardware stores, although I've never looked for it there. I found this pack of cheesecloth at the local Walmart near the sewing supplies. I think it was about $4.00 for a package that's big enough to get at least a few batches of fromage blanc out of!

Part 2: Making the Cheese!

The first step is to pour your milk into the heavy saucepan and begin heating it over low heat. Make sure you stir the milk regularly to keep it from burning on the bottom. If you have a candy thermometer (I don't, but figured a digital meat thermometer was good enough), use it to keep an eye on the temperature. You'll need to heat the milk to about 175 degrees Fahrenheit.
This is easily the most tedious part of the process since it will take a long time to get to 175 degrees over low heat. Try to resist the temptation to turn up the heat though because you'll get the best results with slow, even heating.

You don't have to hit exactly 175 degrees, but the closer you are the better results you'll have. If you don't have a thermometer, you'll know the milk it about ready when it gets bubbly and frothy on the surface, as seen in the above picture.


When you (finally) hit the 175 degree mark, turn off the heat and pour in the buttermilk and vinegar and stir gently. Within a few seconds, the milk should begin to curdle (if it doesn't, add another teaspoon or so of vinegar).


Keep stirring gently until the milk stops curdling. Then go ahead and let the pan sit on the warm burner for ten minutes.


While the curdled milk is sitting, you can get the cheesecloth ready. Place the colander over a pot and cut off a couple arms' length of cheesecloth. Open it up and fold it back over itself a few times to line the colander with a few layers. Tuck the edges of the cheesecloth between the colander and the pan in a couple of places to keep the cloth from slipping.

Once the ten minutes are up, ladle the curds onto the cheesecloth.


Let the curds sit in the colander and drain for about five minutes.


Next, bundle the curds up in the cheesecloth and tie the bundle securely with the string.


Remove the colander and tie the bundle onto your wooden spoon. Then hang the bundle over the pan for another thirty minutes. This will continue draining the cheese and compress the curds into a solid ball of cheesy goodness.

After you've had thirty minutes to admire your hanging bundle of awesome homemade cheese, unwrap the cheesecloth and dump your cheese into whatever container you'd like to use as a mold.

Just plain cheese is kind of bland, so now you can add the salt and mix it into the cheese. If you're feeling creative, you can try mixing in some fresh chopped herbs, seasonings, or whatever else you might want into your cheese too.


One the salt has been thoroughly distributed into the curds, it's time to press the curds into the mold. I found that a good way to do this was to use the cheesecloth to apply firm, even pressure across the surface until the curds were packed tightly into the bottom of the mold.


Congratulations! You've just made your very own fromage blanc! It's totally fine to eat it right now if you want to. However, if you let it sit in the fridge overnight, the cultures in the cheese will ripen it a bit and give it a more complex favor. Wrap your cheese or place it in an airtight container and chill it until you're ready to use it.

And the last step: Enjoy your amazing cheese! Fromage blanc makes a great appetizer spread on crackers or bread. You can substitute it for soft cheeses like ricotta in your favorite recipes. In France, fromage blanc is sometimes sweetened and served with fruit as a dessert. Or you could just eat it right out of the mold (not that I'd know anything about that).